Nature Communications

- Altmetric
Metal three-dimensional (3D) printing includes a vast number of operation and material parameters with complex dependencies, which significantly complicates process optimization, materials development, and real-time monitoring and control. We leverage ultrahigh-speed synchrotron X-ray imaging and high-fidelity multiphysics modeling to identify simple yet universal scaling laws for keyhole stability and porosity in metal 3D printing. The laws apply broadly and remain accurate for different materials, processing conditions, and printing machines. We define a dimensionless number, the Keyhole number, to predict aspect ratio of a keyhole and the morphological transition from stable at low Keyhole number to chaotic at high Keyhole number. Furthermore, we discover inherent correlation between keyhole stability and porosity formation in metal 3D printing. By reducing the dimensions of the formulation of these challenging problems, the compact scaling laws will aid process optimization and defect elimination during metal 3D printing, and potentially lead to a quantitative predictive framework.
Identifying scaling laws in metal 3D printing is key to process optimization and materials development. Here the authors report scaling laws to quantify correlation between process parameters, keyhole stability and pore formation by high-speed synchrotron X-ray imaging and multiphysics modeling.
Introduction
In metal three-dimensional (3D) printing, also called additive manufacturing (AM), components are typically built layer by layer via local melting and (re)solidification of feedstock materials, often gas-atomized metallic powders. This process provides considerable freedom to design local features, such as geometry and composition, in addition to enhancing manufacturing flexibility and reducing material waste. However, metal 3D printing has a vast number of parameters with complex interactions and dependencies to be considered when making a component1. Many authors have quantified the effects of various individual parameters or groups of parameters2–6. However, universal physical relationships, which are proven to be valid for different materials, processing conditions, and machines, have remained elusive. The multivariate and multiphysics nature of the metal 3D printing processes complicates parameter optimization, materials development and selection, and real-time process control.
During laser powder bed fusion 3D printing, a topological depression (termed a keyhole) frequently forms, which is caused by vaporization-induced recoil pressure7. Keyhole dynamics is inherently difficult to understand and predict because of its complex dependence upon many physical mechanisms but important to be able to quantify because it is highly related to energy absorption and defect formation in metal 3D printing. The geometry of the keyhole significantly affects the energy coupling mechanisms between the high-power laser and the material3, which leads to unusual melt pool dynamics8 and solidification defects1. An instable keyhole might also cause severe process instability and structural defects, including porosity, balling effect, spattering, and unusual microstructural phases9. Recent research capturing meso-nanosecond keyhole dynamics with high-fidelity simulations discovered keyhole-induced back-spattering and frozen depression defects10. Although such keyholes were studied for laser welding in 1970s11, high-quality in situ experimental data on keyhole dynamics only recently became available via high-speed X-ray imaging. These high-energy X-ray imaging experiments have been conducted in laser melting of bare plate12, powder bed13–18, and powder flow19. As compared with traditional post-mortem characterization of cross-sectioned fusion regions3–5, ultrahigh-speed X-ray imaging provides adequate temporal and spatial resolutions for probing keyhole evolution and stability.
Another longstanding issue in metal 3D printing and welding is the generation of excessive porosity. Much effort has been directed at determining the physics underlying this phenomenon, as well as finding ways to eliminate or ameliorate it20. Several mechanisms that lead to porosity formation have been identified, such as lack of fusion21, instability of the depression zone6, vaporization of volatile elements22, and hydrogen precipitation23. However, these efforts are still far from producing a predictive model for porosity—it is challenging to distinguish the quantitative impact of different mechanisms on the final, observed porosity. This makes it impossible to predict the porosity type and magnitude and to optimize processing conditions to build pore-free parts. Elegant insights into the behavior of complex systems, such as metal 3D printing, can be provided by low-dimensional patterns expressed as compact mathematical equations or scaling laws. This adds simplicity to highly multivariate and/or multi-dimensional systems and helps guide process tailoring toward rapid scientific discovery and optimum engineering design24.
In this work, in order to identify scaling laws in 3D printing we start by generating and collecting in situ synchrotron X-ray imaging2 data with various process parameters and materials (Supplementary Data 1). We then apply dimensional analysis25 to normalized governing equations of the system to identify scaled parameters and achieve dimensionality reduction. A multiphysics model is used to interpret energy absorption mechanisms and support the scaling laws. Those compact scaling laws with the property of dimensional homogeneity can be confirmed via the application of nonlinear symbolic regression method such as genetic programming26.
Results
Universal scaling of keyhole aspect ratio and its stability
The aspect ratio of the keyhole, , defined as keyhole depth


One-dimensional law for keyhole aspect ratio controlled by the Keyhole number.
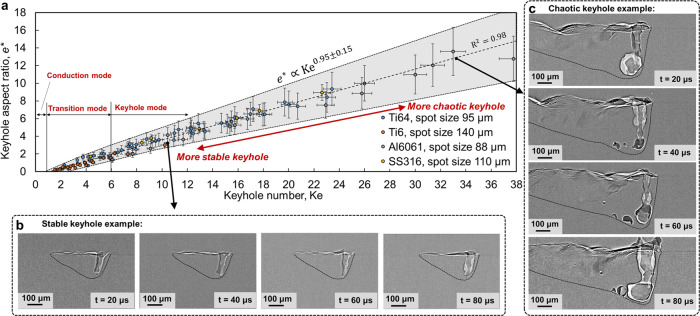
a Identified scaling law, which is universal because all the data collapse to a single curve, even though they correspond to various laser power (100–520 W), scan speed (0.3–1.2 m/s), laser spot size (44–70 µm), and three different materials (Ti-6Al-4V (Ti64)2, Aluminum alloy 6061 (Al6061), and Stainless Steel 316 (SS316)). Time-dependent keyhole depth is measured from high-speed X-ray images at a 20-µs interval for each process condition. The maximum and minimum of keyhole aspect ratio during the time period when the laser scans 2 mm length at the middle of the sample are marked as vertical error bars. Horizontal error bars indicate 3% error amount to account for uncertainties of the process parameters and material properties. b Operando X-ray image series with a 20-µs interval showing the keyhole and melt pool morphologies in the stable keyhole region of Al6061. Laser power is 416 W and scan speed is 0.6 m/s. c Operando X-ray images showing keyhole morphologies in the chaotic keyhole region of Al6061. Laser power is 520 W and scan speed is 0.3 m/s. The fusion boundary (outlined by the black dashed line) can be identified by the X-ray imaging because of the density difference inside and outside the fusion region (some operando X-ray images without dashed lines are shown in Supplementary Fig. 10).
The identified scaling law for keyhole aspect ratio (or keyhole depth) is different from the law for fusion region depth (or melt pool depth)3. The depth of the fusion region is certainly larger than the keyhole depth and does not linearly scale with keyhole depth owing to the drastic difference in melt pool geometry and melt flow pattern under different laser conditions. We can thus quantify the three different melting modes of the material using the keyhole aspect ratio


Equation 3 represents a scaling law with respect to process parameters. It indicates that the keyhole aspect ratio is proportional to absorbed laser power
More interestingly, the variation in the keyhole aspect ratio,

Keyhole instability or variability is not observable using the traditional post-mortem characterization3–5. We identify a scaling law for the variation in the keyhole aspect ratio (Eq. 5) using X-ray imaging. When the Keyhole number is relatively small, e.g.,
Energy absorption revealed by multiphysics modeling
The absorptivity


Comparison between experimental data and multiphysics simulations with various Keyhole number.
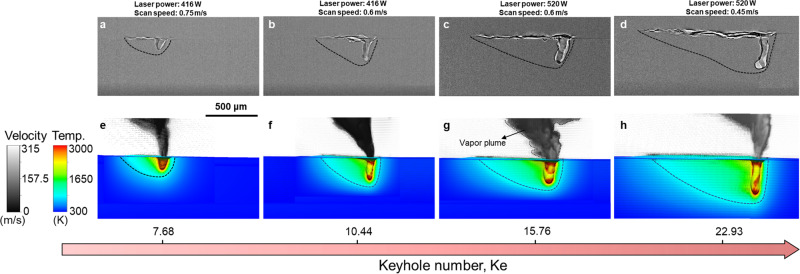
a–d Operando X-ray images of the scanning laser melting of Al6061 at steady state. e–h Multiphysics modeling showing temperature contour at the longitudinal cross-section and vapor velocity field above the substrate (the velocity at a spatial point is represented by an arrow and the length of the arrow is proportional to the magnitude of velocity at the specific point). The simulated high-speed vapor jet (approximately 200 m/s) impacts the keyhole interface, which is one of the sources driving the fluctuation of the keyhole and energy loss due to convection. The black dots outside the vapor plume area indicate low-speed flow (<10 m/s), specifically eddies of gas phase induced by the high-speed vapor plume.
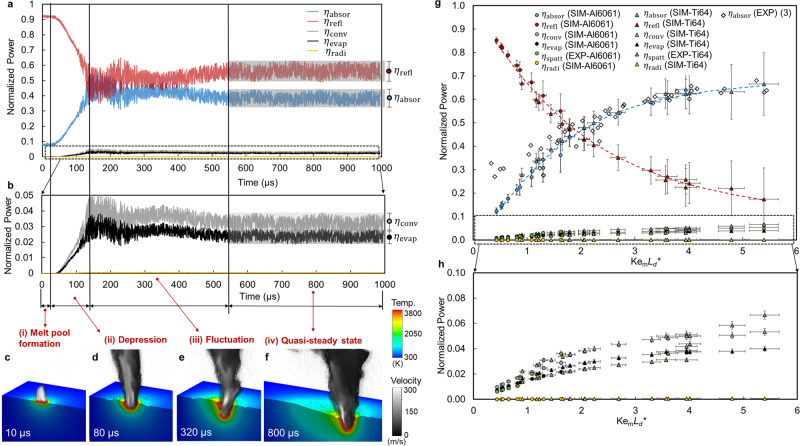
To select dominant effects and parameters for the scaling law, our model analyzes energy losses due to various mechanisms, including the reflection of the laser beam, convection caused by the vapor jet, latent heat of evaporation, surface radiation, and droplet spattering (definitions in Supplementary Method 2). The absorbed energy equals the laser energy input minus all the energy losses. Since the absorbed energy varies in a complex way depending on the keyhole morphology and temperature, our multiphysics model captures the transient keyhole morphology and the corresponding normalized power (i.e., time-dependent power divided by constant input laser power), including the absorbed part and lost parts (Fig. 3a–f). The simulation result presents four distinct regimes of this transient process: (i) melting and melt pool formation, (ii) vapor depression and keyhole growth, (iii) keyhole fluctuation, and (iv) quasi-steady state (Fig. 3a, b). These four regimes have been observed experimentally2. The time-resolved variations in absorbed power arise because of transient keyhole dynamics. Once the peak temperature is higher than the boiling temperature of the material, the absorbed power rapidly increases as the keyhole depression deepens because of the multireflection of the laser beam between the walls of the depression. After this transition, the keyhole walls fluctuate strongly, which leads to fluctuations in all the normalized powers. The lower-frequency fluctuations on the order of 104 Hz then gradually disappear, while a higher-frequency fluctuation on the order of 106 Hz still exists. The magnitude of the higher-frequency fluctuation for each normalized power in the quasi-steady state is recorded as the error bars shown in Fig. 3a, b, g, h. We identify a scaling law of the process-induced absorption using 30 multiphysics simulation cases. This scaling law is validated using experimentally measured absorptivity3 (marked on Fig. 3g). The governing parameters include the Keyhole number


Simulation of the evolution of normalized powers.
a Transient normalized powers for a case of Ti6Al4V (laser power is 210 W and scan speed is 0.4 m/s.), including normalized absorbed power
The scaling parameter
Inherent correlation between keyhole and pore formation
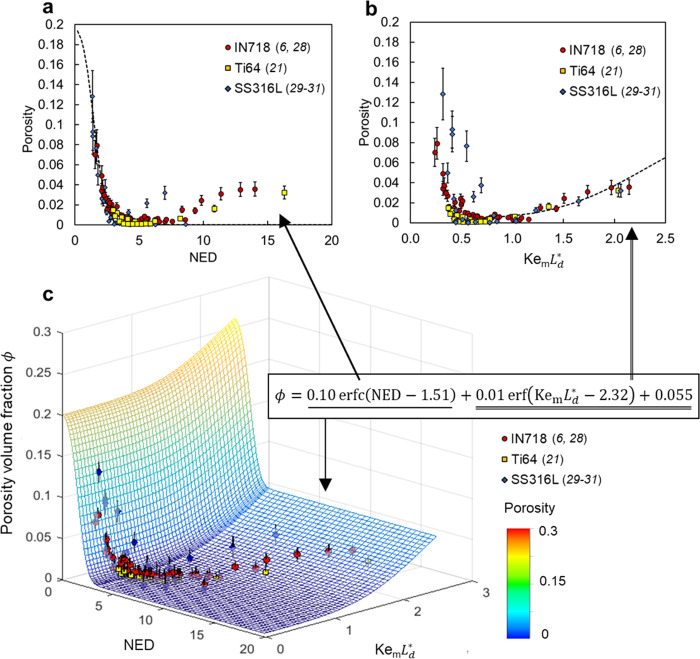
Furthermore, we quantify inherent correlation between keyhole stability and porosity formation in metal 3D printing. We analyze the previously reported printing-induced porosity data (Fig. 4). A simple scaling law defines a two-dimensional (2D) pattern that retains descriptive capabilities for porosity data collected from six independent studies6,21,28–31 spanning ten process parameter sets and material properties. This scaling law is expressed as


Two-dimensional (2D) scaling law for volume fraction of porosity.
a The first term of the scaling law associated with the normalized energy density (NED), which quantifies porosity formed via the lack of fusion process. b The second and the constant terms of the scaling law associated with the product of Keyhole number,
The first term of the scaling law for porosity is related only to NED. This term fits data with low NED, which is a regime characterized by lack-of-fusion defects (Fig. 4a). When NED exceeds the critical value (approximately 5), lack-of-fusion porosity can be avoided and the efficacy of NED as a predictor of porosity decreases. Meanwhile, the second term and the constant part of the scaling law begin to represent the observed data well (Fig. 4b). Since the Keyhole number
Discussion
Although the proposed scaling laws are verified in laser-based AM processes, the methodology and results can be applied to the broader field of energy beam research with some necessary modifications. Possible areas of applicability include laser welding and cladding32, abrasive waterjet milling33, and arc/plasma/electron beam-based manufacturing34. For example, some modifications would be required to apply these laws to electron beam-based AM processes. We hypothesize two reasons: first, the energy absorption mechanism of electron–material interaction (i.e., electron collision) is different from laser–material interaction (i.e., laser multiple reflection), which could lead to a different form of energy absorptivity in the scaling law. Second, electron beam fusion is typically conducted in a vacuum environment instead of an Argon/Helium shielding environment used in most laser-based AM processes. The vacuum environment alters the vapor plume dynamics and resulting keyhole size and morphology.
Although the X-ray experiments are conducted on a bare plate in this work, a previous study reports that the keyhole depth does not change significantly by adding a powder layer between 50 and 100 µm deep2. Recently, another study18 reconfirmed this statement by concluding that the boundary of the keyhole porosity regime in process parametric space varies only slightly between the bare plate and powder bed conditions. Thus, we believe that the proposed universal scaling is valid for powder bed AM process although some fitting constants might need to be adjusted to account for uncertainties and biases caused by the powder layer35. In this study, we apply the scaling laws to a broad set of data and commercial powder bed AM machines. The results demonstrate that there is a significant correlation between the proposed Keyhole number and porosity formed during powder bed multitrack and multilayer AM processes. These results demonstrate the effectiveness of the proposed scaling laws in practice for AM processes, which might have potential to be used for quantifying other keyhole-related defects, such as spattering and soot.
The keyhole scaling laws (Eqs. 1, 2, and 5) are valid for a quasi-steady-state melt pool, meaning that the melt pool is well developed, and the melt pool size and temperature distribution are approximately unchanging in time (although some fluctuations exist in practice due to the highly dynamic multiphase flow). Several experimental and simulation results have shown that in powder bed AM processes the melt pool can reach the quasi-steady state within a few milliseconds (or after laser scanning 1–2 mm from the start)36,37. Therefore, even though AM in practice involves multitrack and multilayer build conditions, most of the solidified region is created while the melt pool is in a quasi-steady-state condition for which the proposed scaling laws are valid to control the keyhole size and stability. However, it is worth noting that the proposed keyhole scaling law is inapplicable to a transient melt pool appearing at the starting and end positions of the scanning track or laser turning locations, where the keyhole exhibits different size and morphology as it in quasi-steady state38.
This study provides experimental data obtained using ultrahigh-speed synchrotron X-ray imaging and simulation data created with a well-tested multiphysics model. These data are particularly useful for the development and validation of statistical and machine learning models. Multiple scaling laws are derived to quantify keyhole aspect ratio and keyhole instability, which is not observable using the traditional post-mortem characterization. A developed multiphysics model elucidates energy losses due to various physical mechanisms. We discover an inherent quantitative relation between keyhole instability and porosity formation, which provides better predictive capability than classical qualitative descriptions. The keyhole dynamics embedded by these compact scaling laws enables to quantify process-induced phenomena in metal 3D printing. These concise laws are able to reduce complex, highly multivariate problem spaces into descriptions involving just a few physically interpretable parameters. The dominant laws for keyhole stability and porosity reveal dynamics underlying the laser–metal interaction processes, which can potentially lead to quantitative predictive models for controlling defect generation in metal 3D printing. The reduction of high-dimensional parameter space means that fewer experiments will be required to determine optimal processing conditions for new materials and thus ease the Edisonian burden endemic among current metal 3D printing practitioners.
Methods
Materials
We manufactured 50 mm-by-3 mm-by-0.75 mm samples of aluminum (Al6061, McMaster-Carr, USA) and 50 mm-by-3 mm-by-0.5 mm samples of stainless steel (SS316, McMaster-Carr, USA) from as-received plates using conventional manufacturing methods (cutting and milling). The samples were polished on all sides before being loaded into the vacuum chamber at the beamline.
Selective laser melting apparatus
We built a custom selective laser melting apparatus by integrating an ytterbium fiber laser (YLR-500-AC, IPG, USA), a galvo laser scanner (IntelliSCANde30, SCANLAB GmbH., Germany), a vacuum chamber, and multiple translational motor stages. Ar gas is filled into the chamber to prevent the potential oxidation of the metals. The laser wavelength was 1070 nm and the maximum power was 540 W. The laser source was operated in single mode, providing a Gaussian beam profile. At the focal plane, the laser spot size was ≈50 μm. In this study, samples were positioned at a certain distance below the focal plane to achieve larger laser spot sizes on sample surface (1.5 mm for a spot size of 84 μm, 1.8 mm for 93 μm, 2.5 mm for 114 μm, and 3.5 mm for 144 μm). Uncertainty of the laser spot size on sample is about ±5 μm. Single track laser melting experiments were performed on the samples under various laser powers (208–520 W) and scan speeds (0.3–1.2 m/s).
High-speed X-ray imaging
The high-speed X-ray imaging experiments were performed at beamline 32-ID-B of the Advanced Photon Source at Argonne National Laboratory. A short period (18 mm) undulator with the gap set to 12 mm was used to generate polychromatic X-rays with the first harmonic energy centered at 24.7 keV. The X-rays were allowed to pass through the sample while the laser was traversing across the top surface. The propagated X-ray signal was converted to visible light using a LuAG:Ce scintillator (100-μm thickness) and recorded with a high-speed camera (Photron FastCam SA-Z, USA) after passing a 45° reflection mirror, a relay lens, and a ×10 objective lens. The nominal spatial resolution of the imaging system was 1.93 μm/pixel. We recorded high-speed X-ray images at frame rates between 20,000 and 50,000 frames per second with exposure times between 1 and 40 μs, with higher exposure times used for stainless steel samples. A series of delay generators were used to trigger the X-ray shutters, laser system, and high-speed camera sequentially. More details of the high-speed X-ray imaging experiments on laser AM are provided elsewhere12,14.
Data processing and quantification
The images of keyholes and melt pools were processed and analyzed using ImageJ39. Each image stack includes a time series of images. For each, we first duplicated the original image stack (A) to create an identical stack (B). Second, we duplicated the first slice of stack A and the last slice of the stack B. Third, we divided image stack A pixel-wise and slice-wise for each slice by stack B to reduce background noise and increase contrast of the interesting structure features. Fourth, we used a despeckling median filter to further eliminate speckle noise. Finally, we adjusted the brightness and contrast manually to enhance contrast and ease visualization and dimension measurement. We quantified the size of the melt pool and keyhole based on contours of attenuation contrast. This involved manual inspection and measurement of each image in all the image stacks in ImageJ, recording the XY coordinates describing length and depth of the melt pool and keyhole for each image. The maximum, minimum, mean, and standard deviation for each stack were calculated.
Wavelet transform (WT)40 was used to analyze the normalized power curves and quantify the frequency as it changes over time. The order of magnitude of the dominant frequencies was approximated from the WT analysis. The WT was implemented in MATLAB 2019 (MathWorks, USA). The time–power curves were converted to time–frequency spectrums. The mother wavelets were the generalized Morse wavelets41. The sampling frequency used was 1788 kHz.
Supplementary information
The online version contains supplementary material available at 10.1038/s41467-021-22704-0.
Acknowledgements
We gratefully acknowledge the computing resources provided on Bebop, a high-performance computing cluster operated by the Laboratory Computing Resource Center at Argonne National Laboratory. We also thank the Center for Hierarchical Materials Design (CHiMaD), in particular, our ongoing work with Lyle E. Levine has been synergistic. W.K.L., Z.G., O.L.K., and L.F. were supported by the National Science Foundation (NSF) through grants CMMI-1762035 and CMMI-1934367. O.L.K. acknowledges support through the NSF Graduate Research Fellowship under Grant No. DGE-1324585. N.P., C.Z., and T.S. would like to acknowledge Laboratory Directed Research and Development (LDRD) funding from Argonne National Laboratory, provided by the Director, Office of Science, of the U.S. Department of Energy under Contract No. DE-AC02-06CH11357; the work by O.H. was performed under financial assistance award 70NANB14H012 from U.S. Department of Commerce, National Institute of Standards and Technology as part of the CHiMaD. This research used resources of the Advanced Photon Source, a U.S. Department of Energy (DOE) Office of Science User Facility operated for the DOE Office of Science by Argonne National Laboratory under Contract No. DE-AC02-06CH11357.
Author contributions
O.H., W.K.L., and Z. G. supervised the project. Z.G., O.L.K., and O.H. analyzed the results and wrote the first manuscript. N.P., C.Z., and T.S. designed and conducted the experiments. Z.G. implemented the multiphysics modeling and dimensional analysis. L.F. conducted post-processing of X-ray images.
Data availability
All data are available in the main text or the Supplementary Information. The data consist of X-ray imaging movies and Excel files, including measured keyhole dimensions and simulated transient powers.
Competing interests
The authors declare no competing interests.
References
1.
2.
3.
4.
5.
6.
7.
8.
9.
10.
11.
12.
13.
14.
15.
16.
17.
18.
19.
20.
21.
22.
23.
24.
25.
26.
27.
28.
29.
30.
31.
32.
33.
34.
35.
36.
37.
38.
39.
40.
41.
 Universal scaling laws of keyhole stability and porosity in 3D printing of metals
